- Pham Xuan Hieu

- Feb 18
- 9 min read
Updated: 3 days ago
Project start: Jan 9, 2026 (see world file creation date)
Documentation start: Feb 18, 2026.
The number 1 and absolute hardest thing about building a mega-base is motivation. This is not a cozy house. Not a little statue. Not a tiny pond or waterfall to add to the background. This is a massive floating island with mountains going to height-limit and tons of houses packed into it. It's going to take many many months.
I'll take all the time I need to plan out this build, as one mistake can cost me even more time.
As long as I'm making some progress, I'm doing good.
Days only goes up if I open Minecraft.
Day 1: Ideas on Paper
I only had a brief idea for a floating island and my base on it, but no idea what that base would be. Maybe a castle, a city, a palace. What I knew I want was to have villagers closeby, running around the place and doing their thing. (I'm done with trapping them inside a 1 by 1 by 2 "prison cell", time to give them some real houses)
Of course, I'm aware of how inconvenient this would be. I will need roam the island to find the one guy I need. Villagers might fall off the island or find some stupid places to get stuck in. But I think that's fair for how Over-Powered they are.


Created the world and downloaded mods: axiom + litmatica.
Day 3-4: Messing around with Axiom to make a floating island
I had basically no idea how to use Axiom and the scale of builds in Minecraft, so I just made a guess.
From a middle block, I extended 100 blocks in 5 directions (north, south, east, west and upward). Then, I sketched the shape of the island (see picture below) and made mountains within that shape using elevation tool.
Elevation tool for mountains -> extract mountains -> invert -> floating island
Land after mountain extraction: (taken on Feb 18, 2026)

The dripping rock has been unwantedly affected due to future construction using Axiom, but is mostly the same. Thanks to Axiom being a powerful tool, this massive thing was built very easily. No progress has been made to these spikes since.
Island bottom (taken on Feb 18, 2026):

Day 5-8: Messing around, looking at references.
I know I want to have a floating island with something on it... but I don't know what exactly...
I checked out Grian's castle (from How to build a mega base), The Inbetween (Dream SMP), White Cathedral (Pixelbiester, inspired by Notre Dame de Laeken), also looked at lots of mega village build but never settled down on anything.
The test build below are made from gold, diamond, and redstone blocks. Builders usually use these blocks to shape their builds before changing them to more colorful blocks.

Day 9: Aquarious Statue - but not in Minecraft
While scrolling Pinterest, I collected cool, smaller stuff I want to include in the base, such as this water goddess statue. (I'm an aquarious so it'd make sense to have some kind of water in my base)

Still not knowing what I wanted to have on the island, I decided to make these smaller objects and come back to the base later
It may look like you can copy the statue block by block, but nope. I've tried that, it's not easy and not reliable. One, it's very difficult to see where one block ends and another start. Two, the backside is not visible, so copying the full statue isn't possible.
So I had another idea.
The plan: Make 3D model in MakeHuman -> Pose model in Blender -> use drububu.com to convert to schematic (litmatica mod) -> paste schematic into Minecraft.
If you don't understand, don't worry. I'll explain as we go.
I knew that there was ZERO chance that I was gonna make a 3D human model. Human anatomy is hard AF. So I use MakeHuman, a 3D human model maker with sliders. It let me easily customize the character's height, nose, arm length, and so on like in video games.
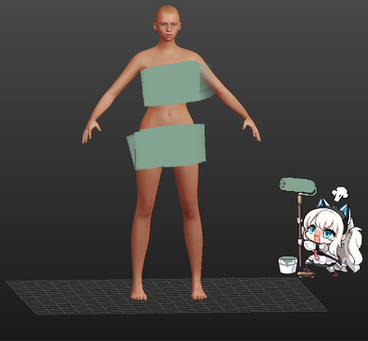
The default model is on the left, final character on the right.
MakeHuman does not offer good hair design so I removed it. Also, I think it'd be easier to add hair once the statue is in Minecraft than to try and model it, so I skipped it in Blender as well.


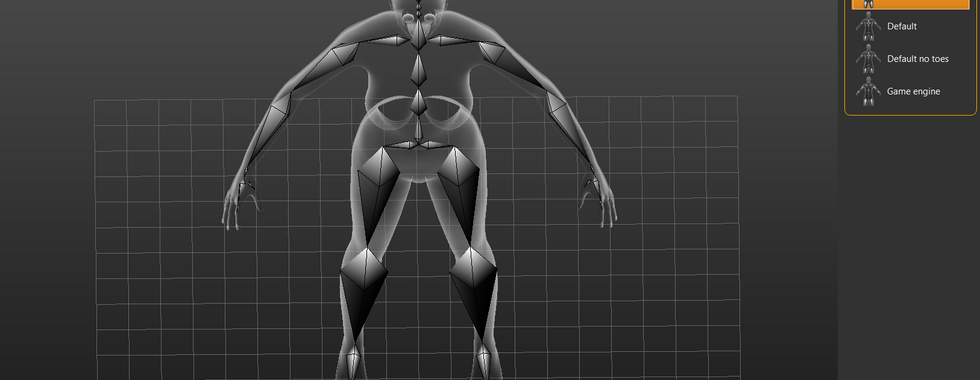
Skeleton option in MakeHuman: Game Engine
Skeleton, or rigging, is exactly what you think it is: the skeleton of the model. To get a model into a pose that you like (e.g. running, sitting, punching), you need to move the "bones" and "joints" and the "meat" will move with it.
There are 4 skeleton options in MakeHuman: cmu mb (simplified), default (complex with detailed fingers, toes and facial bones), Default no toes (its name), Game Enginer (simplified but with finger bones)


Day 10-11: Blender posing
In MakeHuman, export the file as .fbx then import to Blender. And...that didn't go well

Export the file as .obj then import to Blender -> The model is there but no skeleton (cannot pose)
Export the file as .fbx legacy then import to Blender -> There is a skeleton and a model but...it's on the floor and is impossible to pose...

Final: Export as .fbx (this file will carry the skeleton, .obj does not) -> Upload to Mixamo.com (I think mixamo auto-rigger fixes the .fbx but idk) -> Choose a pose on the website -> Export as .fbx -> Import to Blender under .fbx legacy -> Works!
Mixamo pose example (not the one that I chose back then because I can't find it now)

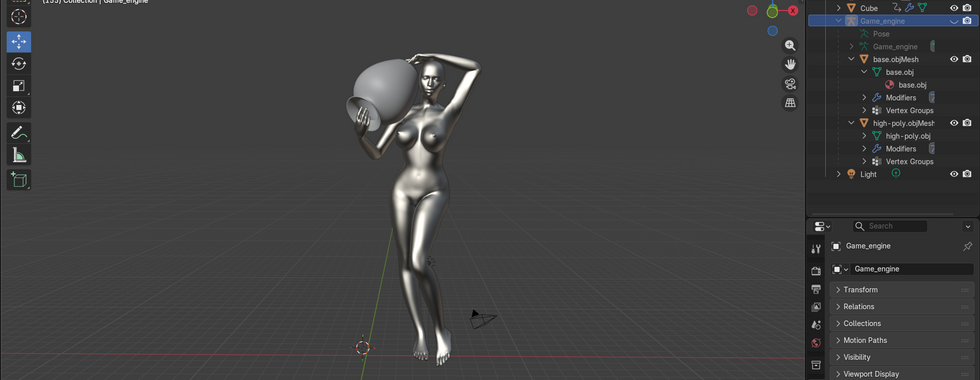
Blender pose result (after importing and making adjusment manually)

Day 12: Vase
There're a bunch of Blender Vase tutorial on Youtube. I just picked one and followed through. https://www.youtube.com/watch?v=PjttSC0_ycE&t=831s&pp=ygUcaG93IHRvIG1vZGVsIHZhc2UgaW4gYmxlbmRlcg%3D%3D
The guy explained it super well, really appreciate it.
Afterward, I played around with the vase measurement until I'm happy and placed the vase on the statue shoulder. Had to move her arms and neck around a bit as well.


Day 13: drububu.com- absolutely goated

I exported the blender model as .obj then put it into drububu. Here I can use the slider to toggle the in-game height (in blocks) of the statue using the slider - the number at the bottom right display the height. Higher = more detailed = looks better.
I downloaded 3 heights as schematics from the website: 50, 80, and 250. The build limit of minecraft is Y=319. I have a floating island that is already high (Y=154) then probably some tall building and mountains that go to height limit. Because I cannot have a statue taller than the actualy base and the surrounding mountains (that would take the spotlight of the build), I believe 50 is enough
50 block statue next to normal 6-7 block tall minecraft houses
Yeah the thing is pretty big.
GO TO DAY 60 FOR STATUE FINAL RESULT
Day 14-15: Mental breakdown ( jk, I still didn't know what I want my actuall base to look like)
I've got the shape of the statue but I'm not feeling like doing the hair modeling and shading and the make statue base, etc etc yet. Imma just chill a bit in normal survival Minecraft for now.
Day 16: Looked at Nether portal designs
Day 17: Prj Demon Sword Start!
Day 18: Sword immurement: Stone
Day 19: Sword immurement: Glass
Day 20: Sword immurement: Stone Gradient
Day 21: Sword immurement: Lava Redstone
Day 22: Sword immurement: Portal Redstone-closing and opening
Day 23-27: Sword magic supression: Floating pillars
Day 28-36: Sword magic supression: Floating pillars Detailing
Day 37: Chose a reference!
I finally settled down with a reference! Rivendell by Edoardo "Salvej" Campagnolo (Rivendell was his inspiration, the actual Rivendell from Lord of the Rings doesn't look anything like his work)

Epithet: Heaven on a Cliff
Name had not been chosen.
Base sketch plan: (Changes as time go on)

Day 38-40 (documentation start on day 40): Construction in Tet (lunar new year celebration)
Name chosen: Asilex
Cylinder to mark out mountains -> Add roughness and a few smaller platforms around for trees
This would take quite some time.
I added in more platforms (such as the red thing) to work on. They will be removed later. In the final build, most of these mountains would connect directly to the spikes below the island instead of having flat green land under it. I plan to have some water flow into the world below as well.


Day 41: Library planning 1
I want it to be decently big. The main floor is one big hall filled with books. The staircase in the back lead downward to where the librarian villagers will be living. There're three floor with six rooms on each for a total of 18 - roughly the number of enchanted books villagers I need. In case I need more, I have space to build a new room for them and that might actually make the building look even more interesting.


Day 42: Library planning 2
Changed staircase, marked out the rooms
A bit of terraforming on the left. There'll be a waterfall there, giving the librarians a magnificent view.


Day 43: First roof design
I tested a few and I like this curved fantasy desgin the most.


Day 44 (Feb 22, 2026): Back-mountain terraforming
Worked on the tall mountain a little bit. Added in some cylinder that I'll smooth out later


Day 45-47 (Feb 23 - Feb 25): Touch grass
It's close to the end of Tet, so I spend most of my time playing with my cousins. We played UNO, cards game that idk how to translate (Tấn, tiến, "bốc phét"), spent a day taking pictures at a flower garden, went to AEON mall, etc.
Day 48-56 (Feb 26 - March 6): Reviews and Exams
Mid-terms are right after Tet, gotta lock in for a week.
Day 57 (March 7): Big roof design
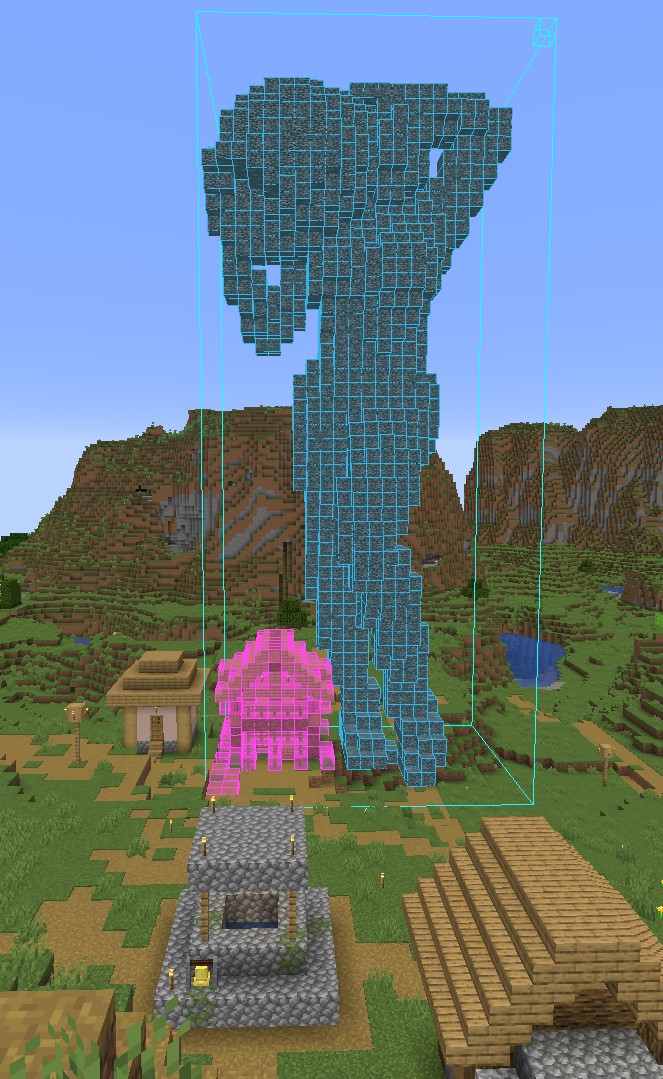
Day 58 (March 20): Cross over bridge
Took 2 weeks off for more exams. So, in order to prepare 12th graders for the university entrance exams (UEE), my school hosts more tests on top of the regular midterm and end-of-term. These tests have the same format as the UEE, just much harder. Honestly, my scores now doesn't matter that much, but it's fun to review with friends.
Anyway, now that's over, I'm back on this project. I'm mapping out the cross-over bridge (in pink) using a benzier curve. The bridge bends a little at the end to connect with a platform on the other side of the island. This curve makes it looks a bit more interesting, I think. We'll see if it's going to making the bridge's roof construction a nightmare.


Day 59-60 (March 30-31): Finishing Water Goddess Statue - Shading
Yeah so...I've been putting this off for too long now. I made the statue model and then just left it there in plain stone...It's time to shade/texture it.
The best way to learn is to copy from masters. I just looked at how the orginal builder (knighty) did and try to replicate.
Copied his block palete (most used blocks are shown in pic) and shadow effect
Reused his hair design
Copied how his stairs and slabs placement (in a way, my statue was made by machine and it's not capable of using stairs and slabs for extra details, so I need to add them manually)
That said, the two statues are different (his is like 150 block tall, mine is 50. His had like a cloth that covers the legs, my doesn't cuz I'm lazy :P) so I didn't literally copy block by block. I couldn't see the back of Knighty's statue as well so I did that on my own :D.


The hair is made from "light gray wool" with some "light gray concrete powder" for highlight, "andesite" to mix things up (idk I just felt like using it), and "tuff" for dark spot (mainly at the end)


Statue base: used torus tool for a stone ring then mix in some other blocks
Outer ring: mainly made from stone with some stone bricks, andesite and gravel
Inner ring and the circular platform: tuff and polished tuff for wet areas, stone for dry and gravel for transition between the two
Kept the floor as stone - other blocks looked too dark for me.
Some final touches and the aquarious statue is DONE :D.

Day 61 (April 1): Redoing mountains
Remade the mountain where the "castle" (my main house but I've not decided what it's going to be yet) from scratch. The original big cylinder was too annoying to shape and so I just rebuild it manually. The overall shape looks quite similar but, trust me, it's different. Or at least remaking it gives me a better understanding of what I really want to build.

The back has been changed to a have a path and little stone blocks that go along side it.


I'm just extending this path all the way around the mountain and planning stuff I think would look good there (the purple ring for a sitting area and the staircase leading upward to something).


Comments